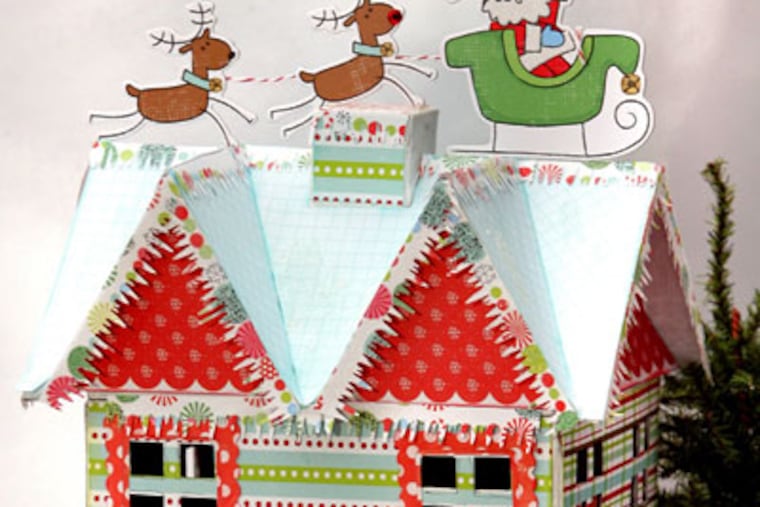
Glittery winter house brightens the season
"When I go shopping I notice a lot of winter houses, but sometimes they are a little too fancy for a normal household, at least for ours because we have kids." So Julia decided to make her own.
She starts with a premade house, but you could also use an old birdhouse.
"The best thing is the roof comes off," she says. So she suggests adding a battery-operated light or candle to give it a nice, wintry glow.
All products are available at Michael's craft stores unless otherwise noted.
For more information on this project and more, visit Julia's blog at buzybunny.blogspot.com
———
SUPPLIES
Me & My Big Ideas holiday paper pad
Craft knife
Me & My Big Ideas holiday chipboard embellishments
Me & My Big Ideas holiday paper strips
Papier-mache house (available at
Plaid Folk Art paints — winter white
Colorbox chalk inks
Glue Arts Glue Glider Pro adhesive
Making Memories Slice die-cut machine and basic 1 cartridge
Hot glue gun
Step 1 — Paint the house. This does not need to be perfect; we'll cover the house with papers. Just enough that you no longer see the papier-mache color.
Step 2 — Select the papers you like for the house. Mix and match stripes, dots and plaids for a fun look. Mark the sides of the paper to cut to the width and height of the house. Then lay the paper down, with the house on the paper. From the inside of the house trace the window shapes onto the backside of the paper. Use a craft knife to cut out the small window openings.
Step 3 — Once you have the house pieces cut out, adhere to the house with Glue Glider.
Step 4 — Cut pieces to fit the roof and sides of home. Julia used a thin piece of "junk" paper to create a template for the roof and sides. Take the paper and press it on the area you need, creasing it along the roof lines. Then cut out the pattern along the crease marks creating a template for the good paper.
Step 5 — After adhering the roof and sides, select a paper to use to create the windows. You can hand cut these or use a die-cut. Ink and adhere to house.
Step 6 — Using the paper strips, punch out pieces you like for the icicles that will hang on the house. You need several to go on the roof lines and across the front of the house. Apply a light coat of the glitter glue, then generously sprinkle the crystal glitter onto the paper. Shake off extra onto paper or glitter tray to return back to the bottom. Then adhere icicle punch strips to the roof line, house and door.
Step 7 — Add small spots of glue using the glitter glue to the roof, roof line and chimney. Sprinkle crystal and tinsel glitter to look like snow has fallen on the roof. You can really go to town here adding quite a bit to make it look like snow has collected on the rooftop. It's your choice how much or how little you use.
Step 8 — Add a small amount of hot glue to the tree and adhere to front of house. Add hot glue to Santa and reindeer and position on rooftop as you like.
Step 9 — Cut a short piece from the red baker's twine. Add a small bit of hot glue to Santa and then to backside of reindeers to look like Santa's reins.
Step 10 — Add a layer of glitter glue around base of house. Then generously sprinkle tinsel glitter for a fun, snowy ground.