How a stability ball can help you build a strong core and reduce back pain
So you want a strong core, complete with trim abs and a powerful lower back? One tool for people at all fitness levels is also one of the least expensive: a large inflatable stability ball.
So you want a strong core, complete with trim abs and a powerful lower back, but don’t know where to begin? Join the crowd. There are so many tools and methods available to help you to achieve this fitness goal, but one I recommend for people at all fitness levels is also one of the least expensive: a large inflatable stability ball.
It’s versatile, light, and not hard to master. But you need the right size to suit your height, as you’ll discover when you go to work both on your core and on hip and leg strength. This is determined mainly by your height, but other factors such as long limbs or a large frame also can make a difference. If you aren’t sure, try a couple and see which feels best. Here’s a quick general guide from the American Council on Exercise:
Shorter than 4′6″: 30-cm ball
Between 4′6″ and 5′: 45-cm ball
Between 5′ and 5′5″: 55-cm ball
Between 5′6″ and 6′2″: 65-cm ball
Taller than 6′2″: 75-cm ball
Here’s another way to check the size: Place the inflated ball in front of a mirror and close to a wall on one side. Place a chair on the other side for stability, especially if you’ve never used this tool before.
The ball should be properly inflated. When you sit, it should have just enough “give” so that it sinks slightly and you can maintain your balance. Do not overinflate.
When you sit on top of the ball, with about two-thirds of the ball behind you, you should be able to plant your feet flat on the floor, shoulder-width apart. At this point your hips should be higher than your knees, which helps protect your lower spine from strain because you can maintain the normal curve of your lower back. If the ball is too small, you risk stressing joints, including your knees.
This series of exercises will introduce you to your versatile new fitness tool, while strengthening and tightening the abdominal muscles, hamstrings and glutes. Additional benefits are stronger hips, tighter thighs, increased flexibility in the spine, and less discomfort in the lower back. Follow these exercises with a regular stretching routine for a well-rounded workout. Two or three times weekly will yield results.
Throughout each movement, keep breathing normally. If you find that you are holding your breath, then count out loud to ensure efficient oxygen intake. For your safety, it’s best to wear sneakers with a non-slip sole while exercising on the ball. You’ll also need a yoga mat for these exercises.
Crunches
Beginner crunches on floor
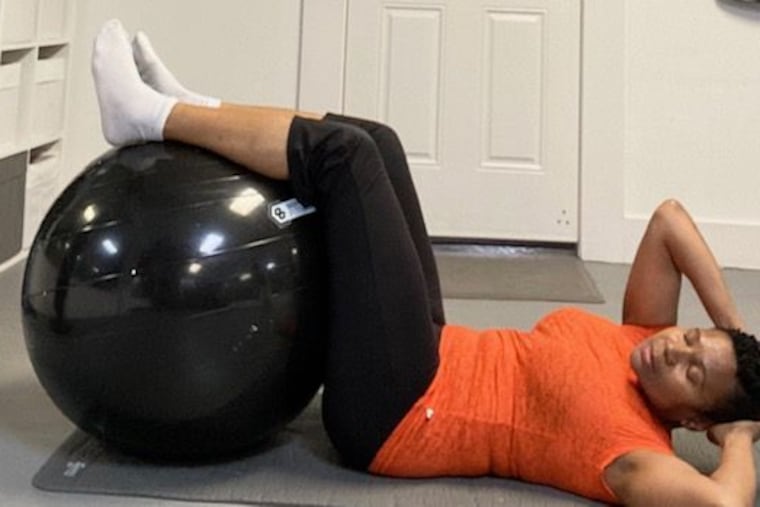
Lie on the mat on your back with your feet on the ball. Move your bottom closer to the ball and press your lower back into the floor while wrapping your legs around the ball. Keep your arms at your sides, palms down. You can have a small pillow or towel under your head if it makes your neck more comfortable. Pick up the ball with your legs as you pull your knees in toward your chest, then put it back on the floor. If this is difficult, do not put the ball all the way down in between repetitions. Repeat 10-20 times.
Next, add upper abdominals. With your back still on the mat, place your hands behind your head and lift your shoulders toward your knees as you lift the ball with your legs. Remember that your head is just resting in your hands; resist the urge to push your head up, which would strain the neck. Instead, focus on raising the shoulders off the floor. Perform three sets of 15.
When you’ve mastered this move, you can progress to twisting your upper body as you crunch, which works the oblique muscles. Aim your left shoulder toward your right knee, then release, and repeat on the other side. Maintaining good form, pace and control are essential for both beginner and advanced exercises.
Advanced crunches on ball
Sit on top of the ball with your feet shoulder width apart. Walk your feet forward until your whole back is on the ball, and your feet are flat on the floor. Place your hands behind your head. Lift your shoulders up toward your thighs, then lower them back onto the ball again. Two sets of 20 repetitions.
When that gets easy, move your feet closer to the ball. Come up as high as you can. Next, try the twisting crunches from this position. Do two sets of 20 repetitions.
Bridges
Beginner bridges on floor
Remain on the floor but now place your legs on the ball, knees bent and lower back pressed to the floor. Your calves are resting on the ball and your feet are relaxed. Arms are at your sides, palms down; head and neck are relaxed. Press your calves against the ball and lift your hips toward the ceiling as high as you can, hold for a count of five, then lower to the original position. Complete 10 repetitions, take a short break, and do it again.
Intermediate bridges: Maintain the position above but place your heels on the ball and bend your knees enough so that the ball is close to your bottom. Lift your hips as high as you can while holding the ball steady with your feet and core. Put your hips down and repeat. Do two sets of 10 repetitions.
Advanced bridges. Sit on the ball, then walk your feet forward until your back is on the ball. Sink down further until your bottom touches the floor and your upper back is pressed to the ball — make sure you’re on a slip-proof surface so the ball doesn’t shoot out behind you. Place your hands on the ball for stability and lift your hips toward the ceiling and back to the floor. Do two sets of 25 reps.
Yvonne Ferguson Hardin (Fergie) is the owner of Fergie’s Instructional Training FIT in Germantown, and specializes in helping older adults maintain and improve wellness.
