3 popular exercises you’re probably doing wrong and how to fix them
If you’ve been working hard at your fitness goals but aren’t meeting your desired results, or if you’re always achy after your aerobic session, faulty form may be to blame.
If you’ve been working hard at your fitness goals but aren’t meeting your desired results, or if you’re always achy after your aerobic session, faulty form may be to blame. Tiny tweaks in your training technique can make a mega difference in the effectiveness and overall experience of your workout. To grow stronger, faster, more balanced, and enhance the way your body performs, you must be mindful and educated about your movements.
By concentrating on such important fitness factors as joint alignment, body positioning, and posture, as well as on which muscles are being targeted, you can safely and confidently achieve your aerobic ambitions. Step one is examining your current fitness routine and fixing any form-related flaws.
Below are three popular exercises that are commonly botched, and the easy modifications to ensure proper positioning.
Glute bridge
The glute bridge is an all-star move. It is similar to the squat as it hits the same major muscle groups in the lower body, but without the added pressure on the hips and knees. However, for this low-impact exercise to be beneficial, you must have body awareness.
The fault: Pushing through the toes, hyperextending the lower back, misaligned legs and feet.
The fix: Having pelvic power and control is the key to conquering the glute bridge. While standing, tilt the pelvis forward. Your back should arch as you shift into this position. Now, rock your hips back. Envision sucking your belly button in toward your spine as you tuck the tailbone beneath the body and tighten the glutes. This second position is what you’ll use during a glute bridge.
If you were in the habit of hyperextending the lower back during a glute bridge (pushing the hips too high), or having an anterior pelvic tilt, you will immediately notice the difference after fixing your form. Once you complete the standing version of practicing the anterior and posterior pelvic tilt, try the same movement from the floor to become familiar and aware of how it feels if you break form.
Step 1: Begin on your back with legs parallel, knees bent, and feet flat on the floor. Your arms are at your sides with palms down for support.
Step 2: Tilt your pelvis back so your stomach sinks into your spine. Hold this form. Push your weight into your heels as you slowly elevate your hips and your the body forms a straight line from shoulders to knees. Squeeze your glutes for two counts. Gently lower to the floor and repeat.
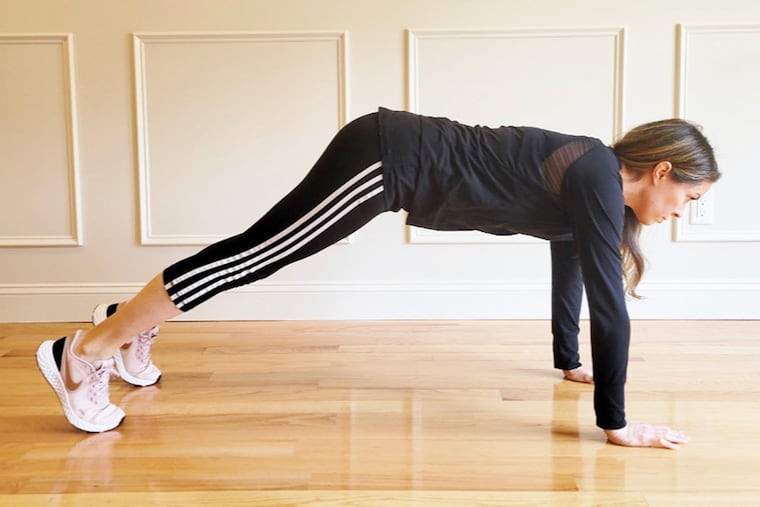
Plank
The plank is a popular pick for perking up the core muscles and improving total body strength. But for those planking incorrectly, this exercise is likely doing more harm than good. Because so many exercises are built around the plank, such as push-ups and mountain climbers, it’s important to get the basics down before branching out to the more complex versions.
The fault: Hiked or dropped hips, head sagging, poorly positioned hands or forearms.
The fix: Focus on the midsection during this exercise. When your muscles fatigue from holding a plank for a prolonged period of time, the hips will compensate by either dipping or lifting. The core muscles must remain engaged to prevent this deviation.
Before planking, go back to that image of drawing your belly button into your spine. Place your hand over your abdomen to identify those muscles tightening. This is what you’ll want to feel while planking. Another trick is squeezing the glutes as you hold a plank to ensure the midsection is stable.
Step 1: Start in a table top position with hands directly beneath shoulders. If you are performing from your forearms, align your elbows below your shoulders.
Step 2: Walk your feet back until your body forms a straight line from head to heels. To prevent neck strain, keep your gaze slightly forward and relaxed. Hold until you reach your ideal goal time.
Step-up
This seemingly simple exercise is much harder than it appears. When done correctly, it bolsters the core and lower body muscles responsible for balance, ankle strength, and muscle definition, as well as providing a killer cardio activity.
Your ability to smoothly and speedily climb steps is a good indicator of heart health, lung capacity, and endurance. If you’re someone who huffs and puffs by the time you reach the top of your staircase, practicing step-ups can enhance the muscles and lung power needed for this skill.
The fault: Stepping through the ball of the foot, and relying too much on the arms for momentum.
The fix: To protect your knees, you must push through your heels. Pressing your weight into the anterior part of the foot is a fast way to feel that dreaded twinge of pain shoot through the knee joint. But if you shift your weight to the heel, the posterior portion of the leg, where your major muscle groups (hamstrings and glutes) are, does all the work. These muscles tend to be underworked, as many exercises and daily activities focus predominantly on quad-dominant movement patterns. This creates muscle imbalances over time.
Step 1: Depending on your balance and abilities, the height of your platform will vary. Regardless, you will want a sturdy base that can safely support your weight. Think of places such as the first or second step on your staircase, a low concrete ledge outside, a well-made workout bench, or a solid chair.
Step 2: Position your foot on the surface of the platform. Be sure that your entire foot is grounded, no hanging heels. Press through your heel to stand. Practice on both sides.
Ashley Blake Greenblatt is a certified personal trainer and wellness coach in South Jersey. To learn more about her virtual training program, go to ashleyblakefitness.com.
