A loaf's life
Freshly baked bread, simple and sensual, can become part of your life, too. Some tips from those who know doughs.
Bread baking seems simple enough - in its purest form just flour, water and yeast with a sprinkle of salt.
And in many ways it is that simple - once you master a few basics, such as feeding the yeast (adding the flour), developing the gluten (kneading the dough), and sensing the "feel" of ripe dough (the perfect smooth, elastic consistency).
It's not as scary as it sounds. And perfectionists aside, you don't have to spend 10 days growing a starter or commit to nursing that "baby bread" for the cloning of future loaves.
But once you accept that bread dough is a living, breathing thing, you may well choose to do that, succumbing to the rich aroma, crackling crust and earthy flavor of an artisan loaf.
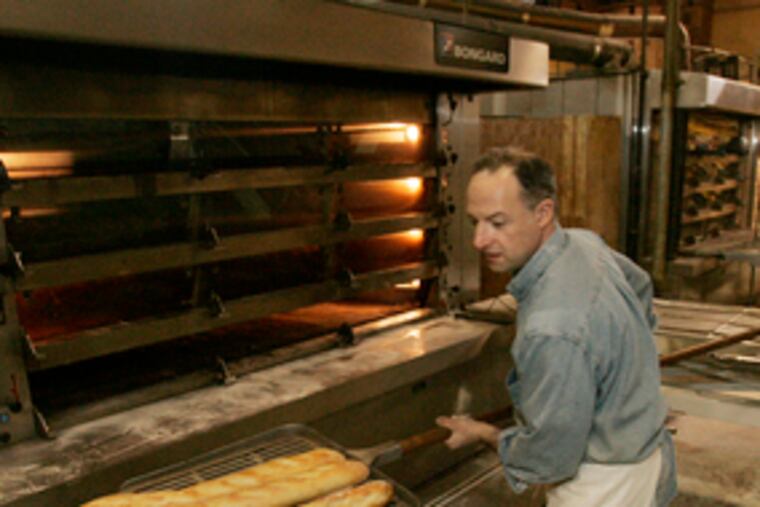
Freshly baked breads and rolls have become a big part of the artisan food production at Talula's Table in Kennett Square.
Talula's is the new creative outlet and home base for Bryan Sikora and Aimee Olexy, who achieved local fame with Django, the small but successful city restaurant they founded in 2001 and sold in October 2005.
"We wanted to diversify our interests. And I see our bread evolving," said Sikora, who relishes labor-intensive, Old-World preparations. At Django, his bread list had a single recipe, a popular flowerpot-baked loaf.
At the new shop, with pastry chef Claire Shears' help, classic French baguettes, sourdough boules and rolls, multigrain batards, focaccia, and hearty pullman loaves for sandwiches come hot from the oven daily.
Shears, 25, is a Culinary Institute of America grad who grew up in Unionville from age 5 but still has roots in the Netherlands, her birthplace.
Before returning home to partner with Sikora and Olexy, she worked in Las Vegas and, for almost a year, in the Hague.
While Shears works with recipes that turn out 16 loaves at a clip, the small scale of Talula's is not that far from a home situation, and she pointed out steps where home bakers tend to fumble or fail.
She emphasized the importance of a hot oven and preheated baking stone for the hot surface or hearth needed to get a crisp crust. And then there's the steam, needed for moisture in the process. Using a spray bottle with water to mist the oven every few minutes early in baking, as she does, is easy for home bakers and makes a difference.
David Braverman, owner and master breadsmith at LeBus Bakery, once described the difference between French and Italian breads thus:
"French bread, the crust is crunchy but light, the bread inside is light, too, almost translucent; there's a light, tart taste.
"But Italian bread has a harder, chewier crust, it's denser and whiter inside.
"I could never make an Italian bread I liked," Braverman said. "Finally, this guy came to work for us from a bakery in New York that made great Italian bread.
"The secret, it turned out, is to use only as much yeast as salt. It comes out of the mixer looking like cement, all grainy and ugly.
"It looks like it'll never rise. But give it its time, four hours, five hours, six hours, sooner or later, that little bit of yeast pushes up all that dough."
Like other professional bakers, Shears recommends using fresh compressed yeast rather than the active dried form. Fresh is harder to find, however, and should be used within a week, so most home bakers opt for the more convenient dried yeast.
Also, don't add too much flour. Start with the least amount called for, Shears suggests, adding more only as needed. Remember, floured hands and work surfaces count.
Timing is everything, especially in bread baking.
Depending on the recipe, ingredients and circumstances (temperature, humidity and such), the bread may need more than two risings. Each rising refines the final texture.
After the first rising, when you let the dough grow in the mixing bowl, you punch it down, work it and let it rise again. It could take 45 minutes, or several hours, depending on conditions. (With experience at handling bread dough or with certain recipes, you may need or opt for a third rising.)
The final rising, after shaping the dough, is the most critical time: Avoid drafts and jolts, or you risk having the soufflelike, gas-inflated mass collapse.
Before putting loaves into a hot oven, use a sharp knife tip to make one or more slashes, up to 1/2-inch deep, on the surface of the dough. This is like venting the crust of a pie, a pressure release valve, that lets the bread rise further and faster.
For more on bread-baking techniques, see the accompanying articles, reference list, and recipes on this page.
Country Bread
Makes 1 large loaf (about 11/2 pounds)
EndTextStartText
For the pre-ferment:
1/3 cup whole wheat starter or 1 packet active dry yeast (1/4 ounce), see Note
1 cup plus 1 tablespoon water, about 68 degrees
1 1/2 cups bread flour
For the dough:
1 cup water, about 74 degrees
1 teaspoon malt extract
3 cups bread flour, plus extra for preparation
1 tablespoon fine sea salt
Yellow cornmeal, for the peel
EndTextStartText
1. For the pre-ferment, 36 to 48 hours before baking, in a large bowl, dissolve the starter or yeast in the water. Use a wooden spoon to stir in the flour for a pancakelike batter. Cover the bowl tightly with plastic wrap and let stand to ferment at room temperature for 8 to 12 hours.
2. For the dough, scrape the pre-ferment into the bowl of a heavy-duty mixer. Add ¾ cup of the water, the malt, and 3 cups flour. With a dough hook attachment at low speed, mix until the dough is a shaggy mass, about 4 minutes. Sprinkle the salt on the dough. Let the dough rest for 15 minutes.
3. At low speed, mix the salt into the dough, 2 minutes. At medium speed, knead the dough 8 minutes, slowly adding the remaining ¼ cup water, 2 tablespoons at a time, kneading to incorporate each addition. Test gluten development by slowly stretching a small piece of dough until it is sheer. If it tears, knead 3 minutes more and test again. (An instant-read thermometer inserted in the dough should register 78 to 80 degrees.) Transfer dough to a lightly oiled bowl at least twice its size. Cover tightly with plastic wrap. Let dough rise in a cool, draft-free place until doubled in size, 4 to 5 hours.
4. Generously sift flour over a cloth-lined banneton (coiled willow bowl) or open basket lined with a cotton towel.
5. On a lightly floured surface, flatten dough to a disk. Turning disk counterclockwise, fold the edges to the center; repeat for a rough ball. Turn dough seam-side down, cup it with both hands, and round to a compact ball. Seal the bottom where creases converge; put the dough seam-side up in the basket. Cover the basket tightly with plastic wrap. Let rise 1 hour. Refrigerate in basket to rise overnight or 12 hours.
6. Remove from refrigerator 2 hours before baking. A half-hour before baking, put a large baking stone on the center oven rack and heat oven to 500 degrees.
7. Sprinkle a baker's peel or back of a baking sheet with cornmeal. Invert dough onto the peel; remove basket. With a razor blade, score top of loaf. Open oven, quickly spray the cavity generously with water for steam. Do not spray oven lightbulb. Slide the loaf onto the baking stone; close oven. Reset to 425 degrees; bake 3 minutes. Open oven and spray around the loaf. Close oven; bake 3 minutes more. Repeat spraying oven. Bake loaf to golden brown, 40 to 50 minutes. Baked loaf will sound hollow when tapped. Let cool on rack.
- Adapted from The Metropolitan Bakery Cookbook by James Barrett and Wendy Smith Born (Rodale, 2003).
Note:
Fermenting a starter from scratch can take 2 weeks. If you have ripe dough, save a small piece to start your next loaf. Refrigerate it for a week, or freeze up to three months. Fresh yeast and malt may be found at home-brewing shops.
Per ounce (based on 24): 95 calories, 3 grams protein, 19 grams carbohydrates, 0.3 gram sugar, 0.5 gram fat, no cholesterol, 242 milligrams sodium, 0.8 gram dietary fiber.
EndText
No-Knead Bread (Slow Rising)
Makes one loaf, about 11/2 pounds
EndTextStartText
3 cups all-purpose or bread flour, more for dusting
1/4 teaspoon instant (rapid rise) yeast
1 1/4 teaspoons salt
1 5/8 cups water
Cornmeal or wheat bran as needed
EndTextStartText
1. In a large bowl, mix the flour, yeast and salt. Stir in the water (dough will be shaggy and sticky). Cover the bowl with plastic wrap. Let the dough sit at least 12 hours (18 is preferable) at warm room temperature, about 70 degrees.
2. Dough is ready when bubbles dot its surface. Place the dough on a lightly floured work surface. Sprinkle a little flour on it and fold it over on itself once or twice. Cover it loosely with plastic wrap and let rest about 15 minutes.
3. Using just enough flour to keep dough from sticking to the surface or to your fingers, gently and quickly shape it into a ball or loaf. Generously coat a cotton towel (not terry cloth) with flour, wheat bran or cornmeal. Put the dough seam side down on the towel and dust with more flour, bran or cornmeal. Cover with another cotton towel. Let rise until more than doubled in size, about 2 hours. When it is ready, dough will not readily spring back when poked with a finger.
4. At least 30 minutes before dough is ready, heat the oven, along with a 6- to 8-quart heavy covered pot (cast iron, enamel, Pyrex or ceramic), to 450 degrees. When the dough is ready, carefully remove pot from oven. Slip your hand under the towel and flip the dough over into the pot, seam side up. It may look like a mess, but that is OK. Shake pan once or twice if dough is unevenly distributed; it will straighten out as it bakes. Cover. Bake 30 minutes. Remove lid and bake until loaf is nicely browned, 15 to 30 minutes. Cool on a rack.
- Adapted from Jim Lahey, Sullivan Street Bakery, in The Minimalist by Mark Bittman (The New York Times, Nov. 8, 2006).
Note: Baking the wet dough in a hot pot (mini-oven) traps steam, mimicking a commercial oven, to produce a crisp crust. The long rising produces a large, well-structured crumb.
Per 1-ounce slice (based on 24): 63 calories, 2 grams protein, 13 grams carbohydrates, trace sugar, 0.3 gram fat, no cholesterol, 121 milligrams sodium, 0.4 gram dietary fiber.
EndText
Talula's Malted Pretzels
Makes 10 to 12 pretzels EndTextStartText
1 ounce fresh yeast
1 2/3 cups warm water (105 to 115 degrees)
3 tablespoons sugar
3 tablespoons barley
malt syrup, divided use
22 ounces bread flour (about 4 1/3 cups), plus some for handling
3 tablespoons salt
Optional toppings: Sea salt, sesame seeds, grated cheese
EndTextStartText
1. Combine the yeast, water, sugar and 1 tablespoon of malt syrup in a bowl. Cover with plastic wrap and let sit in a warm place for 10 minutes. The yeast should bubble and foam.
2. In large mixer bowl, with dough hook, mix the flour and yeast water, scraping the sides as needed, until dough is smooth and elastic. Turn dough onto a lightly floured surface and pat into a ball. Put dough in a lightly oiled bowl, cover, and let rise until doubled, about 2 hours.
3. When ready, in a large pot, bring 4 quarts water to a boil with the salt and remaining 2 tablespoons malt syrup.
4. Meanwhile, roll portions of dough into ropes about 20 inches long, 1/2 inch thick. For regular pretzels, twist each rope into a looped pretzel shape. Wet the ends and pinch them to the loops. For braided pretzels (these can also serve as rolls), make ropes 6 to 8 inches long, 1/2 inch thick. Pinch the tops of 3 ropes together, make a loose braid (do not stretch) and pinch ends together. Repeat with remaining dough. Let the raw pretzels sit to rise for 10 minutes.
5. Meanwhile, heat the oven to 400 degrees.
6. Gently, by hand or with a wide spatula, slip pretzels, one at a time, into the boiling water. Blanch for 10 seconds on each side, turning once. With a wire mesh skimmer, transfer pretzels to a parchment-covered or lightly oiled baking sheet.
7. Sprinkle desired toppings onto pretzels.
8. Bake pretzels until nicely browned, 10 to 15 minutes. Transfer to a rack to cool.
Per pretzel [based on 12]: 219 calories, 7 grams protein, 45 grams carbohydrates, 6 grams sugar, 1 gram fat, no cholesterol, 1,746 milligrams sodium, 2 grams dietary fiber.
EndText