Braise those blues away: Coax cold-weather veggies into something warm and wonderful
Even the most dedicated herbivore can get discouraged by the monotony of root vegetables, potatoes, onions, brassicas, and such that crowd our midwinter produce sections. Fortunately, there's a surefire remedy for the winter vegetable blues: braising.
Even the most dedicated herbivore can get discouraged by the monotony of root vegetables, potatoes, onions, brassicas, and such that crowd our midwinter produce sections. Fortunately, there's a surefire remedy for the winter vegetable blues: braising.
Yes, I know that most of us think of succulent, slow-cooked meats (such as short ribs and lamb shanks) when we hear that cooking term, but this method is indispensable for transforming hearty, long-stored vegetables into flavorful, soul-warming dishes.
I learned that when I wrote my first solo cookbook, All About Braising: The Art of Uncomplicated Cooking. It was winter when I started working on it, so I hungrily dove into developing the classic meat-based braises that I so adored - osso buco, pot roast, pork belly, coq au vin - thinking I'd leave the vegetable chapter for later; I didn't think it would be a very important chapter, anyway.
In short order, I found myself craving variety, and so I began to incorporate braised vegetables into my weekly recipe tests. I instantly fell head-over-heels for the way the technique added variety and complexity, and so much deliciousness, to my wintertime eating. By the time the book went to press, the vegetable chapter had become the biggest (and first) chapter in the book. Today I still love my classic meat braises, but for everyday eating I'm all about the vegetable braise.
For starters, braising refers to the age-old technique of cooking ingredients gently with a little bit of liquid in a covered pot. When applied to vegetables, braising can coax even the humblest plants into memorable dishes, and once you grasp the basic technique, the possibilities are endless.
The timing can be entirely flexible, too. In a hurry? Cut the vegetables smaller. Feeling languorous? Leave the vegetables in big chunks and let them simmer slowly. Of course, you'll get more flavor exchange when you take your time, but you won't ruin the dish by speeding things up. I find that most of my weeknight vegetable braises come together in under an hour, some in as little as 20 minutes, while I might let my weekend versions go for closer to two hours.
Most braises combine four elements: a main ingredient, liquid, seasonings, and a bit of fat. When combined under the lid of a braising pot, the vegetables release their essences into the seasoned liquid, emerging infused with flavor and bathed in a savory sauce - a true example of the whole being greater than the sum of its parts.
Although you can braise almost any vegetable, this simple technique is best appreciated with the older, full-flavored vegetables of winter. A certain alchemy happens under the lid of a braising pot that softens their rugged textures and mellows assertive characteristics. Great choices for braising this time of year are carrots, onions, turnips, rutabagas, fennel, leeks, kale, broccoli, cauliflower, Jerusalem artichokes, endive, parsnips, salsify, escarole, mustard greens, collards, and daikon radishes.
When prepping vegetables for the braising pot, I tend to go for larger chunks and pieces, keeping in mind that the more slowly they cook, the more flavor they absorb. Whatever size you choose, aim for uniformity so that everything cooks at the same rate. If you're combining vegetables, chop tough-textured ones a bit smaller than tender ones so everything will be done at the same time.
The liquid is what defines braising, and your choice of liquid provides the basic profile for the final dish. Water will create the cleanest, lightest taste, but broth (chicken, vegetable or meat) will add a definite savory quality: that hard-to-define umami. Other favorite choices are wine, cider, beer, fruit juice, canned tomato, coconut milk, and cream. Pungent liquids such as vinegar, soy sauce, and fish sauce add tremendous flavor but are best used sparingly in combination with other liquids lest they overpower the dish. Building a braise is a balancing act, and you don't want any single element to dominate.
The amount of liquid is also an important characteristic of a braise. If you add too much, you'll be stewing, and the results become soupy and less concentrated. If you add too little, you're roasting, and you won't get the yielding textures and profound flavor exchange.
My general rule is to pour in enough liquid to come about one-third of the way up the sides of the vegetable, but it depends on the vegetable. Dense, dry vegetables such as carrots or rutabagas might need a bit more liquid than endive or onions. The best practice is to peek under the lid during braising and add a few more tablespoons of liquid, if needed. If it appears that you've added too much, wait until the end, when you can remove the lid and boil down any excess.
As for the seasonings, there's no limit to the possible combinations of seasonings you can add to a braise. Although some of my favorite recipes lean toward plainness (just bay leaf, garlic, salt, and pepper with red potatoes), other times I like to amp up things by sautéing a selection of aromatic seasonings in a bit of oil (or other fat) before adding the vegetables and the liquid.
Classic choices for this flavor base are members of the onion family (garlic, shallot, leek, scallion), fresh or dried chilies, fresh ginger, ground spices, fresh and dried herbs.
A bit of fat is optional, but I urge you to consider including some fat because of its amazing ability to add depth and richness to an otherwise plain dish. Even the thinnest thread of a tasty fat (think olive oil, butter, rendered bacon fat, ghee) added at the start goes a long way to ensure wonderfully full-flavored vegetables.
The most common way to incorporate fat is to begin by sautéing the above-mentioned seasonings in a little oil. You can also drizzle a few drops of oil over the vegetables before covering the pot and setting it to braise. Trust me: Even that little bit of fat makes a delicious difference.
Stove top or oven? The advantage of using the oven (set between 300 and 325 degrees) is that you don't have to worry as much about the liquid evaporating; the downside is that this takes a little longer. Whichever method you choose, remember that the liquid should barely bubble and not boil. A gentle heat plus an extended cooking time results in the best flavor and texture. Doneness is somewhat a matter of personal taste, but tender is what you're after. Depending on the vegetable and the way you've chopped it, the process can take anywhere from 20 minutes to more than two hours.
Braised Potatoes With Bay Leaves and Garlic
Makes 4-6 servings
EndTextStartText
11/2 pounds small red or white potatoes, scrubbed
3 tablespoons extra-virgin olive oil
1 cup no-salt-added chicken broth, or as needed (may substitute water)
2 bay leaves, preferably fresh
2 to 3 cloves garlic, smashed
Kosher salt
Freshly ground black pepper
EndTextStartText
1. If the potatoes are larger than golf ball size, cut them in half. If you are leaving them whole, use a vegetable peeler to remove a band of skin around the circumference of each potato; that will allow the flavors of the braising liquid to penetrate.
2. Place the potatoes in a saucepan large enough to hold them in a snug single layer without crowding. Add the oil, then enough broth to come halfway up the sides of the potatoes. Tear the bay leaves in half and add them to the saucepan, along with the garlic (to taste). Season lightly with salt and pepper.
3. Cover and cook over medium heat; once the broth is bubbling at the edges, reduce the heat to medium-low. Braise, lifting the lid and turning the potatoes with a spoon after about 10 minutes; cover and cook until the potatoes are just tender when pierced with a thin skewer, for a total of about 20 minutes.
4. Uncover and increase the heat to high; boil, gently shaking the pan back and forth, until the water evaporates and you can hear the oil sizzle, about 5 minutes. The braised garlic cloves will break down and coat the potatoes as you shake the pan. Discard the bay leaves; serve hot.
Per serving (based on 6): 140 calories, 2 grams protein, 19 grams carbohydrates, 2 grams sugar, 7 grams fat, no cholesterol, 70 milligrams sodium, 2 grams dietary fiber.
Braised Green Cabbage With Balsamic
Makes 6-8 servingsEndTextStartText
1/4 cup extra-virgin olive oil, plus more for the baking dish
1 small to medium head green cabbage (about 2 pounds), trimmed and cut into 8 equal wedges
1 large yellow onion (about 8 ounces), cut into thick slices
1 large carrot, scrubbed and cut into 1/4-inch rounds
1/4 cup no-salt-added chicken broth
Scant 1 teaspoon kosher salt
Freshly ground black pepper
1/8 teaspoon crushed red pepper flakes, or more as needed
Water (optional)
11/2 tablespoons balsamic vinegar
Fleur de sel or coarse sea salt, for servingEndTextStartText
1. Preheat the oven to 325 degrees. Lightly grease a large gratin dish or 9-by-13-inch baking dish with oil.
2. Arrange the cabbage in the baking dish. Scatter the onion and carrot around the cabbage. Drizzle with 1/4 cup oil and broth; season with the salt, a pinch of black pepper and the red pepper flakes. Cover tightly with aluminum foil; slow-roast (middle rack) for about 2 hours, until the vegetables are completely tender. Use tongs to turn the cabbage wedges after one hour. Don't worry if the wedges fall apart, but do your best to keep them intact. If the dish is drying out, add a few tablespoons of water.
3. Once the cabbage is completely tender, remove the dish from the oven; increase the temperature to 400 degrees.
4. Uncover the cabbage; sprinkle on the balsamic vinegar, carefully turning the wedges to distribute. Return to the oven uncovered and roast for 15 minutes or so, until the vegetables begin to brown. Taste, and add black pepper or crushed red pepper flakes as needed.
5. Serve warm or at room temperature, sprinkled with fleur de sel or other coarse salt.
Per serving (based on 8): 110 calories, 2 grams protein, 11 grams carbohydrates, 6 grams sugar, 7 grams fat, no cholesterol, 270 milligrams sodium, 4 grams dietary fiber
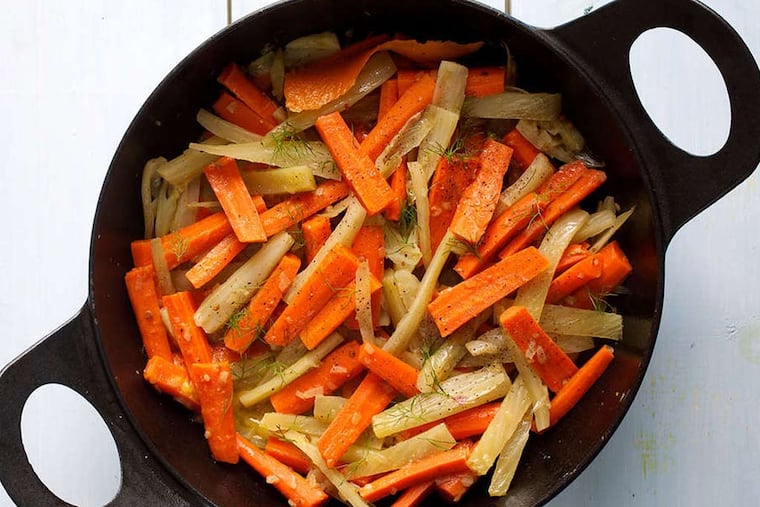
Butter-Braised Carrots and Fennel With Orange Zest
Makes 4-6 servingsEndTextStartText
2 tablespoons unsalted butter
1 large shallot, minced
(a heaping 1/4 cup)
1 teaspoon coriander seed, crushed
2 small bulbs or 1 medium bulb fennel, plus a few fennel fronds for optional garnish
2 strips of orange peel, removed with a vegetable peeler, each about 3/4-by-2 inches
1 pound carrots, trimmed, scrubbed well and cut
into 1/2-by-2-inch sticks
1 teaspoon kosher salt, or more as needed
Freshly ground black pepper
1/4 cup dry vermouth or dry white wine
1/2 cup water
EndTextStartText
1. Melt the butter in a large skillet or shallow braising pan over medium heat. Add the shallot and coriander seed; cook for about 5 minutes, stirring occasionally, until the shallot is translucent.
2. Trim the fennel bulb(s); if desired, reserve a handful of the fennel fronds and coarsely chop them. Cut the fennel bulb into 1/2-inch-thick wedges.
3. Stir the orange peel and fennel into the shallot mixture until evenly coated; cook until the fennel just begins to sizzle, about 4 minutes. (This will give the fibrous fennel a head start on the quicker-cooking carrots.) Add the carrots, and season with the salt and a good pinch of pepper.
4. Add the vermouth or wine; once it begins to bubble, add the water. Cover, and reduce the heat to medium-low; cook for about 40 minutes, stirring once or twice.
5. Uncover; increase the heat to medium and let the liquid reduce for about 5 minutes or until it nicely coats the vegetables. Taste, and adjust the seasoning as needed.
6. Discard the orange peel, if you like. Serve hot or warm, garnished with the fennel fronds, if using.
Per serving (based on 6): 100 calories, 2 grams protein, 14 grams carbohydrates, 7 grams sugar, 4 grams fat, 10 milligrams cholesterol, 410 milligrams sodium, 5 grams dietary fiberEndText