How to carve a pumpkin like a pro ... with tips from an actual pro
A guide to carving pumpkins like an artist. Northeast Philly David Morgenstern — aka Stoneykins — shares his tips and tricks for carving elaborate jack o’lanterns .
Have you ever seen a piece of art and thought, “I could totally do that — and better”?
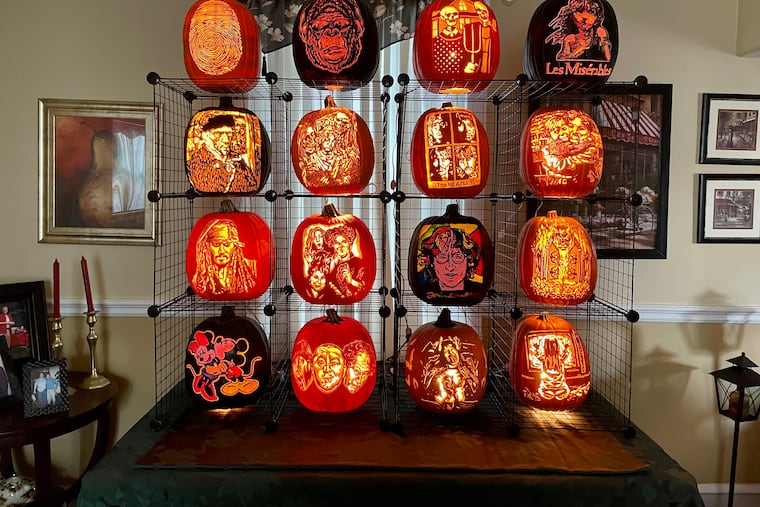
That’s what David Morgenstern realized when searching for pumpkin carving inspiration online 16 years ago. Now, Morganstern runs Stoneykins, where he sells custom-made intricate jack o’lanterns and design stencils, while also running a Facebook hotline to answer pumpkin carving questions.
Morgenstern, who attended the Art Institute of Philadelphia, hails from South Philly. He is winner of the 2013 Pumpkin Masters Online Carving contest and the 2021 Great Pumpkin Carve in Chadds Ford. He’s known for his intricate, detailed pieces, with carvings for the NFL and Rolling Stone Magazine among others.
It’s in the basement of his Fox Chase home, where Morgenstern has his laboratory of tools, tricks and pumpkins to build his creations. Upstairs in his office — filled with more (creepy and friendly) pumpkins — he designs carving patterns and answers the questions of amateur and pro pumpkin carvers around the world.
“I have a year’s worth of work in two months,” he said about the fall season. “One day, I’ll get no orders. One day, I’ll get 25 from the same person.”
Through trial and error, Morgenstern developed two jack o’lantern carving methods — for carvings of the Joker to the gates of Hell — which he shares below.
What tools you’ll need to carve a pumpkin
“The tools are the key,” Morgenstern said, and can make the pumpkin carving process seamless. Find all you need online or at local craft stores.
Serrated spoon or large spoon
Printed designs or stencils (Stoneykins has plenty to choose from.)
Art transfer paper (Morgenstern recommends the white Saral paper.)
Pumpkin carving saw (Morgenstern recommends a Warren Pro.)
Speedball Lino set (Only V and U nibs needed.)
Clay ribbon tool (This is for final cleanup of a shaded carving.)
Pro-tip: You’ll also want a pot
Before you begin, place your pumpkin on a pot for ease of carving. Be sure to find one with a rim size that’s just a bit smaller than the pumpkin you’re carving so that it sits nice and snug.
“If you’re putting it on the table by itself without the pot, then you’re constantly angling it and holding it,” Morgenstern explained. “If you put it on a pot, then both your hands are free.”
1. Cut a hole for the lid
Using your Sharpie pen, outline a carving path at the top of the pumpkin for your lid — the stem will be your handle.
When carving the lid, be sure the Sheetrock Saw is at a 45 degree angle.
“If I was cutting straight, the lid would fall in the pumpkin,” he said. “So if you do it at an angle, it will have a bevel edge.”
Pro-tip: When cutting out the lid, skip the seemingly obvious circle. Outline a little pumpkin instead — the “stem” of your outline will let you easily place the pumpkin’s top back on later, so you don’t have to adjust the lid until it’s flush.
Cut off the access on the lid for a clean top.
2. Gut your pumpkin
Gut the pumpkin with a serrated or large spoon. Then, use a pear-shaped ceramic loop tool to scrape the excess and thin the pumpkin walls.
Be sure to make the front wall — where your design will be carved — even thinner by about ¾ of an inch. (More on how to gauge the wall’s thickness in the next step.)
3. The glue stick method
Smear a washable glue stick on the back of a printed cut-out design. (Print the designs on sticker paper to skip the glue, if you’re okay spending a bit more money.) Cut slits on the sides of the pattern for the design to line up with the curves and groves of the pumpkin.
Stick the pattern on the pumpkin and overlap those slits for a nice fit. Smooth out wrinkles.
“Wherever you see grooves of the pumpkin, you wanna get your finger and put that pattern right in the groove,” he shared. “It only takes a little to make (the pattern) flush.”
Wait about 5 to 10 minutes for the glue to dry. Then, carve right through the pattern with a No. 2 X-Acto Handle with No. 15 keyhole saw blades. Be sure to test the thinness of the pumpkin wall with the blade — if most of the blade comes through, you’re all set. (Scrape the wall a bit more till the blade is clearly visible.)
Saw in a continuous motion for quick carving. Move the blade up-and-down without removing it from the pumpkin. Adjust the pumpkin as you carve for the best leverage.
After carving, soak the pumpkin to remove the printed design and excess glue — the paper will fall right off. Scrub off any remaining glue residue.
... Or try the transfer method
Tape art transfer paper (white works best) on the pumpkin. Place your printed design on top and use a pen to outline the pattern. Then carve the outline with the Speedball Lino, V nib.
Use the Speedball Lino, U nib for everything in between the outline. Smooth out ridges with a clay ribbon tool. These tools allow you to easily scrape and design on the pumpkin skin.
This method works best for carving shaded or three-color patterns.
“The pattern is a negative image, but when you carve it and light it, it becomes a positive,” Morgenstern said.
4. How to keep your jack o’lantern alive longer
Pumpkins, like humans, need to stay hydrated, Morgenstern said.
To make it last, dunk the pumpkin in water with bleach after carving — just in and out. For every gallon of water, add four tablespoons of bleach. Get the scented bleach if you wanna get fancy with it.
“It stops mold and mildew,” he shared. “Your pumpkin’s (going to) last longer — it’ll give you like two weeks.”
And to keep squirrels from snacking on your pumpkin, dampen the pumpkin and sprinkle paprika on it.
“They don’t like the taste of it — they’ll take a lick and say goodbye,” he said.
Final pro-tips for some festive fun
Christmas lights are best for lighting a jack o’lantern. But if you’re using a real candle, make sure you have a hole for venting.
Morgenstern’s pro tip: Sprinkle some cinnamon powder on the inside of the lid. The candle will “cook” the spice and your jack o’lantern will smell like pumpkin pie.
